How to Create Django Template in Python
Django has a special feature that generates HTML dynamically. The T(Template) in the MVT(Model-View-Template) architecture refers to the same concept. In Django, the template holds the static HTML part along with the syntaxes that make the web pages dynamic.
It is important to note that we can configure multiple template engines or even no template in a Django project. Django has a built-in templating system called Django template language(DTL). One other popular templating engine that works flawlessly with Django is Jinja2.
Irrespective of the templating backend, Django has pre-defined APIs for loading and rendering different templates. Basically, the standard API that comes with Django looks for the template for a given path(identifier) and usually compiles it to an in-memory representation. It then further renders the generated template with the context data and returns the result respectively.
To better understand this concept let’s take a look at an example.
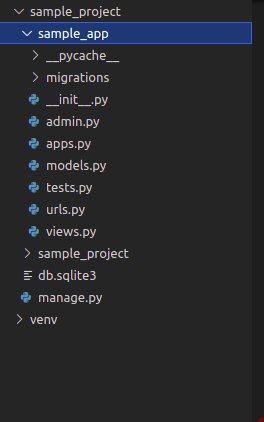
We already have a simple project named sample_project, within the project we have a simple app named sample_app. Take a look at the below image for reference of the project structure:
Configuring Templates in Django:
If we open up the sample_project/setting.py file you can find the below code by default:
TEMPLATES = [
    {
        'BACKEND': 'django.template.backends.django.DjangoTemplates',
        'DIRS': [],
        'APP_DIRS': True,
        'OPTIONS': {
            'context_processors': [
                'django.template.context_processors.debug',
                'django.template.context_processors.request',
                'django.contrib.auth.context_processors.auth',
                'django.contrib.messages.context_processors.messages',
            ],
        },
    },
]
Note: The above setting is auto-generated whenever we use the django-admin startproject command to create your project. The above-shown settings are by default available and we can modify the same depending upon our template engine needs.
Now for this to work on our local machine, we need to provide the path to our templates in the DIRS section the TEMPLATES variable as given below:
'DIRS': [os.path.join(BASE_DIR,'templates')],
For this to work we will also need to make the following imports to our settings.py file:
<code>
At this point out TEMPLATES variable will look like below:
#import os module at the top
import os

TEMPLATES = [
    {
        'BACKEND': 'django.template.backends.django.DjangoTemplates',
        'DIRS': [os.path.join(BASE_DIR,'templates')],
        'APP_DIRS': True,
        'OPTIONS': {
            'context_processors': [
                'django.template.context_processors.debug',
                'django.template.context_processors.request',
                'django.contrib.auth.context_processors.auth',
                'django.contrib.messages.context_processors.messages',
            ],
        },
    },
]
For the sake of simplicity, we will stick with the default template settings for the rest.
Best-suited Backend Development courses for you
Learn Backend Development with these high-rated online courses
Working with Django Templates:
Now to work with templates, we need a view that has to be mapped with the project URLs. We already have built a view named sample_view (please backlink this to Introduction to Django Views article), that returns the current date and time and we have mapped the same view to the URL file of the project.
At this point our project looks like below:
Now let’s modify the sampel_view to make this example more relevant to this article. So open up the sample_app/sample_view.py file and add in the below code:
# import render from django shortcuts module
from django.shortcuts import render

# create a function
def sample_view(request):
        # Add the data that we need
        # to display in the template to a dictionary.
        # This data will be passed to the template
        # data to the template to the template
        context ={
                "current_topic":"Introduction to Django Templates",
                "covered_topics": ["Getting started with Django",
                "Introduction to Django Views",
                "Introduction to Django Models"],
                "uncovered_topics":["Introduction to Django Forms",
                "Class-Based Views in Django"]
        }
        # return response with template and context dictionary
        return render(request, "sample_view.html", context)
The above view has information on the current topic that we are discussing and the list of topics that we have already covered.
Now that our view is ready, let’s create a templates directory inside the sample_project directory and create an HTML file named sample_view.html within the templates directory. Inside the sample_view.html file add in the below code:
<!DOCTYPE html>
<html lang="en">
<head>
        <meta charset="UTF-8">
        <meta name="viewport" content="width=device-width, initial-scale=1.0">
        <meta http-equiv="X-UA-Compatible" content="ie=edge">
        <title>Shiksha Online</title>
</head>
<body>
        <h1>Welcome to Shiksha Online Platform</h1>

<p> Article Name: {{ current_topic }}</p>

        <h4>Topics covered so far: </h4>
        <ul>
                {% for i in covered_topics %}
                <li>{{ i }}</li>
                {% endfor %}
        </ul>

        <h4>Topics yet to be covered: </h4>
        <ul>
                {% for j in uncovered_topics %}
                <li>{{ j }}</li>
                {% endfor %}
        </ul>

</body>
</html>
Since our sample_view is already mapped to the urls.py file we do not need to do it again. So now, let’s start the server and check out the final results using the below command:
python manage.py runserver
At this point if we visit http://127.0.0.1:8000/, we can see the following results:
Understanding Django Template Language(DTL):
At this point, you might have figured out that Django templates are simple text documents or python strings marked up with DTL. The template engine is responsible for recognizing and interpreting the constructs. The primary constructs that are used are variables and tags.
Constructs in DTL:
A Django template is rendered with a context. When a template is rendered, the variables are replaced with their values, which are derived from the context, and the tags are just executed at compile time. The rest of the template is just part of the output.
There are 4 constructs in DTL:
- Variables
- Tags
- Filter
- Comments
Let’s take a look at each of them in detail.
1. Variables: If you take a look at the sample_view that we created above, you can observe that all the data that we wanted to display in the template (ie, current_topic, covered_topics, uncovered_topics), we stored in a dictionary like structure named context (you can give it any name). A variable outputs the values from the context by mapping keys to values.
Variables are surrounded by two curly brackets like {{ variable_name }}. In the sample_view.html file, we have used the concept of variable as:
Article Name: {{ current_topic }}
This gave us the following part of the output:
2. Tags: The tags hold the logical aspect of the templates while rendering them. Tags can not just only output content, but can also serve as a control structure e.g. a “for” loop, fetch data from the database, or even enable access to different template tags within the project.
Tags are surrounded by curly brackets with two percentage symbols like {%tags%}. In the sample_view.html file, we have used the concept of tags as:
{% for i in covered_topics %}
and,
{% for j in uncovered_topics %}
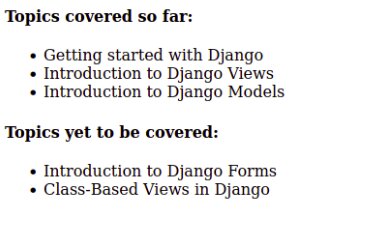
The above tags iterate through the list inside the context and display each of them. The above tags have given us the following parts of the output:
3. Filters: Filters basically transform the values of variables and tag arguments. These can be used to alter the value of variables depending upon the requirement. They are generally represented as {{variable_name|filter_name}}.
For instance, if we have the following filter:
{{value|length}}
And the values in the context are [“a”,”b”,”c”], it will return the value 3 which is the length of the value.
4. Comments: As the name suggests itself, these are used to comment out a piece of the template that doesn’t need to be rendered but needs to exist in the template code for reference. In this, any pieces of code that come between {%comment %} and {%end comment %} will not be rendered. A simple example would be as follows:
{%comment %}this won't be rendered{%end comment%}
Conclusion:
In this article we covered the following concepts:
- What are Django templates?
- Configuring Django templates
- Creating Django templates
- Concept of Django Template Language(DTL)
- Constructs in DTL
Explore More:


