GIT Tutorial for Beginners
Git is a source code management tool used in DevOps. It is a free and open-source version control system used to manage small to massive projects efficiently.
GIT Tutorial for Beginners
In this Git tutorial, we will first understand what Git is? Git is a distributed version control system that you can use for managing source code. A wide number of developers across the globe use Git for managing and deploying the source code of an application. Git performs the following key tasks:
- Track changes in source code
- Enable collaboration on application development
- Track progress of application development
- Merging code changes effortlessly
In this article we will cover the following Git concepts:
So now that we know what Git is and what Git does, let’s take a look at setting up Git on your system.
Best-suited Github courses for you
Learn Github with these high-rated online courses
Installing Git on Linux(Debian/Ubuntu):
Follow the below steps to install Git on Linux operating system:
Step 1: Open up the terminal and use the below command to first update all the dependencies on your System:
sudo apt-get update
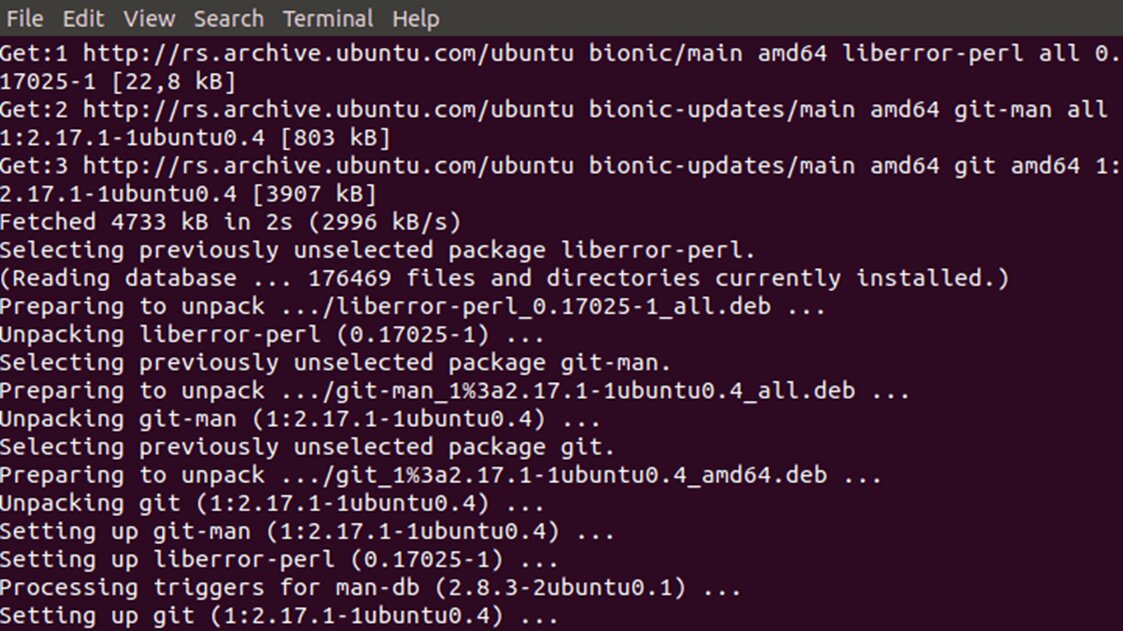
Step 2: Once all the dependencies are updated, run the below command to install Git on your system:
sudo apt-get install git
You’ll get a simal message as shown below once the installation is complete:
Step 3: Now to verify if the installation is successful, use the below command:
git –version
This command should show you the version of the installed Git as shown below:
Step 4: Now we need to configure the username and email of your git account. For this we can use the below command:
git config –global user.name “<YOUR USER NAME GOES HERE>”
git config –global user.email “<YOUR EMAIL GOES HERE>”
Now, you are ready to use Git on your Linux system.
Installing Git on Windows:
Follow along with the article “GIT Installation on Windows” to set up Git on your Windows system.
How Does Git Work?
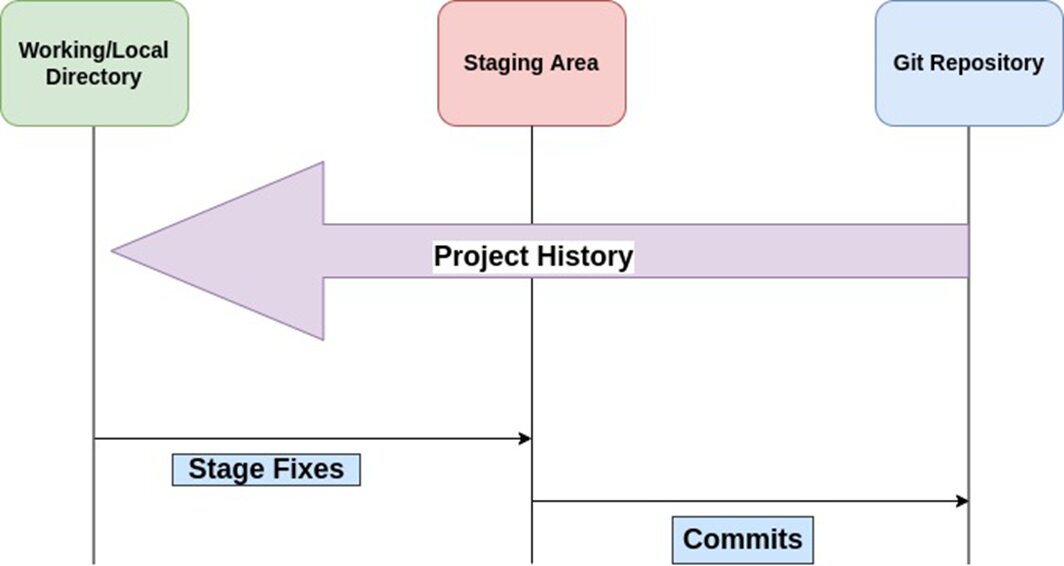
Git has 3 fundamental states on which this version control system operates, namely:
- Local Copy: Various copies of the main source code repositories are made and each developer can have their own private local copy of the application source code. All the changes are performed and tested at this state of git.
- Staging Area: Stagging is a concept in Git where you specify which files and their respective changes are to be committed on the remote git repository. Once you are satisfied with the changes made by you on the local copy, you can add them to the staging area using the git add command from where the changes will be added to the main repository.
- Git Repository: Once the changes made by you are in the staging area, you can commit the same permanently to the main repository. This is where the code for your production application resides. Here you can track the project development history and along with that, you can also view all the changes made so far to the main repository.
Take a look at the below diagram for reference:
Features of Git:
In this Git tutorial article, let’s go through the features of Git:
- Secure: Git maintains the code integrity by limiting access to the main source code. On top of that Git is actively maintained and serviced that further protecting it from other security vulnerabilities.
- Scalable: Git is highly scalable but one needs to keep in mind that your codebase needs to be maintained in a disciplined manner. It is also important to keep in your mind that as your project gets bigger, it will be more complex to scale project.
- Performance: As discussed previously, git stores all the data in local and remote repositories, which allows git to fetch data directly from the local repository further enhancing the speed and performance of git as a source code management tool.
- Reliable: Having the concept of local and remote repositories also reduces the dependency on the central git server for backing up the user data. If for any reason the central server crashes, you can easily restore it using the local repository on the developer’s system. This feature makes Git more reliable and reduces the chances of data loss significantly.
- Lightweight: Git implements a lossless compression to store data locally on the user’s system. This makes sure that the data stored locally requires minimal space. On top of that fetching, these data are now further less compute-intensive.
- Economical: Git is released under the General Public License(GPL). It is free to use by individuals and enterprises for all intents and purposes. This makes it widely accepted by developers and industries globally.
- Compatibility: You can access all git repositories irrespective of the operating system. You can access Git remotely using SVNs which allows users to switch to git without cloning the repository.
Now that we have made ourselves familiar with the basics of git let’s take a look at the key git commands that one should be familiar with.
Must Explore – Tutorial – How to Use GitHub
Key Git Command:
1. Create a Git Repository: Use the below command to initialize an empty git repository locally. This will create a local .git folder.
git init [repositry_name(optional)]
Example:
2. Adding changes to Staging Area: We can make use of the below command to add the changes made by you to the staging area.
git add [file_name]
In case you need to add all the changes to the staging area use the below command:
git add .
Example:
3. Attach message with commit: Commit messages are a concise description of the changes in the committed code. To add a message associated with your commit use the below command:
git commit -m [message]
Example:
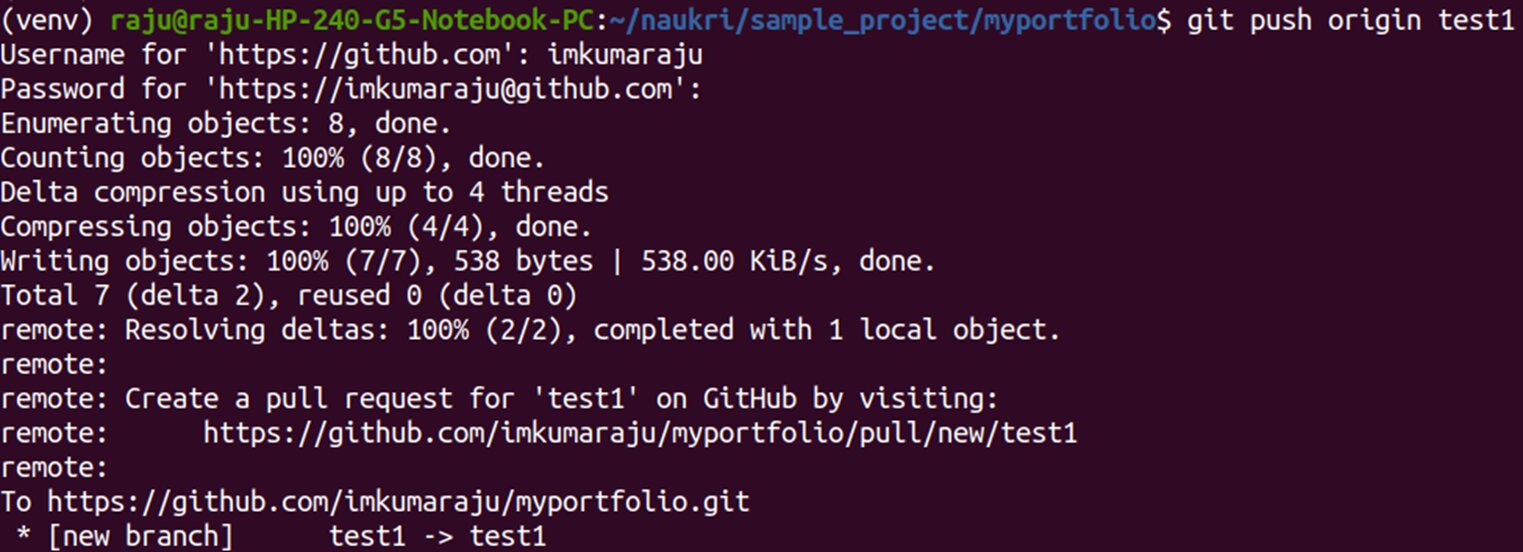
4. Push your code to the remote Git repository: Once you are satisfied with the change you made and the changes have been staged, it is ready to be merged with the primary repository. For this you need to push your staged changes using the below command:
git push origin [repositry_name]
Example:
5. Merging branches: The commits from a specific branch can be merged with the production code after the commit has been reviewed by the administrator. You can use the following command to merge the commit:
git merge [branch_name]
Example:
6. Updating local repository: To make sure the local repository that you are working on is up to date with the code of the main repository, we take a pull of the main repository using the below command:
git pull [variable_name] [remote_repositry_name]
Example:
Check out the “Top 20 GIT Commands with Examples” article for additional commands that you should also know about.
Conclusion:
In this Git tutorial article we have managed to get an overview of the following Git concepts:
- What is Git?
- How to install Git?
- Working of Git
- Features of Git
- Key Git Commands
This Git tutorial will teach beginners the fundamentals of the Git version control system.
Top Trending Tech Articles:Career Opportunities after BTech Online Python Compiler What is Coding Queue Data Structure Top Programming Language Trending DevOps Tools Highest Paid IT Jobs Most In Demand IT Skills Networking Interview Questions Features of Java Basic Linux Commands Amazon Interview Questions
Recently completed any professional course/certification from the market? Tell us what liked or disliked in the course for more curated content.
Click here to submit its review with Shiksha Online.
This is a collection of insightful articles from domain experts in the fields of Cloud Computing, DevOps, AWS, Data Science, Machine Learning, AI, and Natural Language Processing. The range of topics caters to upski... Read Full Bio


