Implementing VGG-16 using Pre-Trained Model
This article will explore VGG-16 with implementation using python.It will include Installing required Libraries and cataract classification is done.
Before trying to understand what VGG-16 is, it is important to know about convolutional neural networks or CNN.
A CNN is one of the important deep learning algorithms, where convolutions or filters are applied over the image to extract information. Each subsequent layer extracts more complex information. For example -If we are building a classifier for Dog vs Cat, then the first layer will extract features like edges, then the consequent layers will extract more complex features like part of the body and finally the complete image.
VGG-16 is one of the CNNs with fixed architecture. It won the 2014 ImageNet competition and was created under the paper – “VERY DEEP CONVOLUTIONAL NETWORKS FOR LARGE-SCALE IMAGE RECOGNITION” by Karen Simonyan and Andrew Zisserman.
ImageNet dataset consisted of 1.2 million images for training with 1000 categories. The categories varied from different types of animals, humans to objects like umbrella, bicycle etc. For validation and test, it consist of 150,000 images collected from flickr and other search engines.
Also read: A Guide To Making a Career in Deep Learning
Architecture
It consists of 16 layers. Initially the model receives an input of image with dimension (224,224,3). Now the important thing to remember is that during ImageNet, the model was trained for this input size but we can change this for our specific problem, which we will see later during implementation. Firstly it passes through 2 convolution layers with 64 channels, 3*3 filter size and same padding and then Max-pool layer with filter size of 2*2 and stride of 2. This is followed by 2 convolutional layers of 128 filters with filter size 3*3 and a max pool layer with pool_size 2*2 and stride of 2 same as before. After this there are 3 sets of 3 convolutional layers and a max pooling layer. The first set contain convolution layers with 256 filters, filter size of (3,3) , same padding and max pool layer with pool_size 2*2 and stride of 2. The later two sets consist of convolution layers with 512 filters, filter size of (3,3) , same padding and max pool layer with pool_size 2*2 and stride of 2 each.
We are not considering the final block here which consists of a Dense layer because the original model is trained to classify among 1000 classes but our problem might consist of a different number of classes. We will see later how to resolve this for our use case in implementation.


Best-suited Python for data science courses for you
Learn Python for data science with these high-rated online courses
Problem Statement
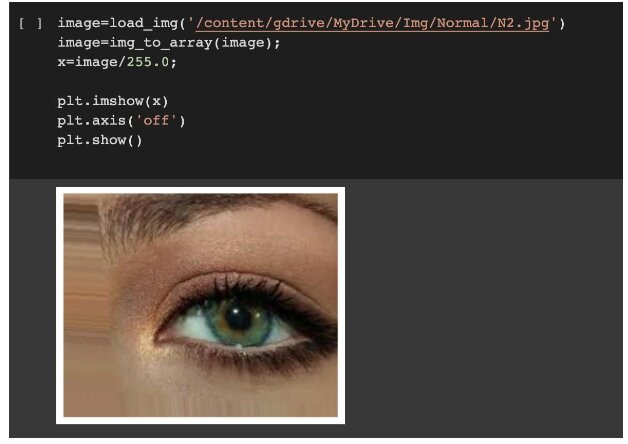
Here we will be implementing the pre-trained model of VGG-16 using transfer learning to solve the problem of cataract classification. We will train our model on images of the eye, which either has cataract or not. There are only 2 classes(Cataract and Non-Cataract) and the dataset is already split into train and test set. The dataset is available here . The images are of various sizes. The images in the dataset looks like this:-
After training, the model will be able to learn to predict whether any given image of the eye has cataract or not.
Instead of creating the model from scratch, we will be using an already existing model from tensorflow and customizing it according to our needs.
Now let’s dive into applying VGG-16 for cataract classification.
Installing required Libraries to implement VGG-16
First you should have your python environment ready and check its version. You can check the current version using:python -V
You can also use ‘sys’ library to check the version:import sys print(sys.version)
If you are using Google colab, it comes with already installed libraries. But if you are implementing in your local system or jupyter notebook, you can download the following libraries using the method mentioned below:-
1.Tensorflow
We can install tensorflow using pip, from this command:pip install tensorflow
Or if you have conda environment, you can activate tensorflow using thisconda activate tf
2. Keras
You can use pip to install keras:pip install keras
2. Pandas
Using pip we can install using:pip install pandas
On conda, we can install using:conda install anaconda
3. OS
This is python’s standard library, so there is no need to install it.
4. Matplotlib
Similar to other libraries, we can install Matplot using pip using the command below: python -m pip install -U
5. matplotlib
The libraries installed should be compatible with the current version of your python environment. If it’s not, you need to install the specific version of the library or update your python environment. For example, if you want to update the TensorFlow library, you can use the following command:- pip install –upgrade tensorflow. Similarly, we can use it for other libraries.
Implementing a pre-trained model of VGG-16 for Cataract classification
Loading Data
Let’s see what our data look like. We will be using cataract and non-cataract images of eyes for the classification task. The dataset consists of images of various sizes. For displaying an image, we can use the following command:
Before diving into creating the model, we will first load data on which our model will be trained. You can see from the image below that I am using Keras ImageDataGenerator to load the data. While using the ImageDataGenerator,we are also using Data Augmentation (horizontal_flip, vertical_flip, rotation_range). The reason for doing this here is that it will create more image diversification and help models learn general features. We have created separate generators for Train and Test data.
Now that our data is loaded, we will build the model.
Building VGG-16 Pre-trained model
- First, we will be using TensorFlow to extract the pre-trained model using VGG-16, using the method shown below. One thing to notice is the parameters we have used. We have given the value of input_shape to a fixed value, which will be the image size, in this case, the images of the eye to which we are giving input to the model at the time. Here, we have taken the include_top parameter as False because, in the actual model of VGG-16, it was trained for classification among 1000 classes, but here, we might have a different number of classes (Let ?????? be the number of classes). Therefore we won’t be considering the top layers of the model. Weights parameters specify that we are taking the weights on which it was earlier trained during ‘imagenet’.
2. One advantage we get when using a pre-trained model is that the weights it learned for
‘imagenet’ serve as a generic model for other tasks. The base model consists of 14,714,688 parameters. Training the model from the start would be time-consuming and computationally costly.
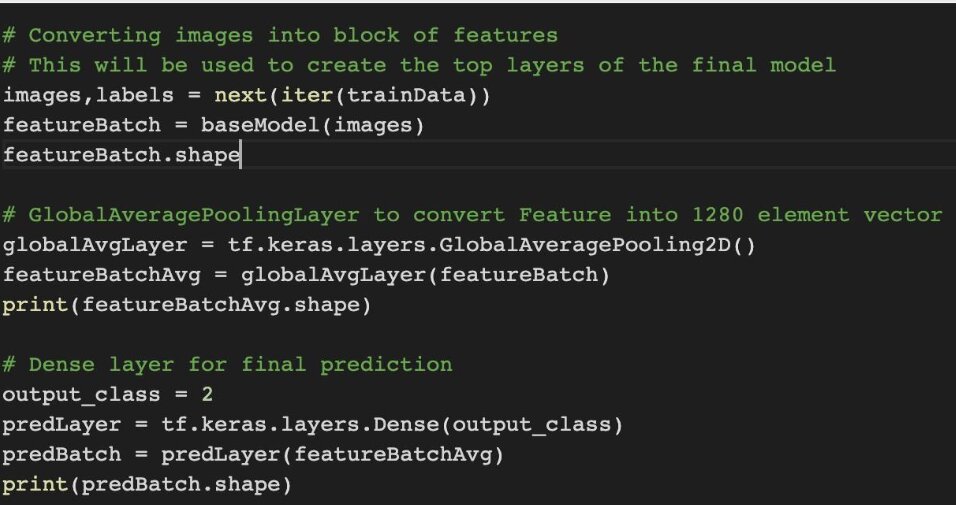
3. The next step is to create the top layers for our model. Now, these layers will be specific to your problem and can be different from one use case to another. For this example,we have added two layers: GlobalAveragePoolingLayer and Dense layer. Here Firstly, we are creating a featureBatch variable which will be storing features from the image, which will be pixel values. Then the GlobalAveragePooling layer will convert these features into a 1-D vector. This vector will be passed through the Dense layer, which will finally classify the input image into one of the ??????, which is 2 in this case(Cataract and Non-Cataract).
For fine-tuning, we can try different combinations of additional layers like a custom Convolutional layer or MaxPolling layer with different values for kernel size, filters, and stride and check which combination works best for your problem.
4. Finally, we will combine the base model and the newly created top layers. Here the ‘inputs’ variable contains an input-tensor of the input image where I have specified the shape using InputShape. Then we added the consequent layers on the top of base-model in the form of variable x. ‘model’ is our final model.
Training
Now that we have the data and the model ready, let’s compile the model. Here we use the loss function as BinaryCrossentropy and Adam optimizer with a 0.001 learning rate. Finally, we will train the model with the data loaded before using the ‘fit’ function and pass our data and the number of epochs.
Result
Let’s visualize the accuracy and loss on both pieces of training as well as validation data using the matplot library. You can find the code to plot the accuracy and loss below.
This is the result that we got in this case. We can see that during the starting epochs, the accuracy started increasing, but then it settled down at around 97% accuracy in just a few epochs. And the loss initially decreases abruptly and then gradually.
This is how we can implement the pre-trained VGG-16 model and configure it according to your requirements. We can make the model work for any number of classes by changing the value of variable ??????.
Hope you had fun learning about VGG-16 and implementing it in your computer!
Contributed by Ankur
This is a collection of insightful articles from domain experts in the fields of Cloud Computing, DevOps, AWS, Data Science, Machine Learning, AI, and Natural Language Processing. The range of topics caters to upski... Read Full Bio


