How to use Google Colab for Machine Learning Projects
In this article, we will briefly discuss how to use google colab for machine learning projects.
Introduction
Google Colaboratory, popularly known as Colab, is a web IDE for python that was released by Google in 2017. Colab is an excellent tool for data scientists to execute Machine Learning and Deep Learning projects with cloud storage capabilities.
Colab is basically a cloud-based Jupyter notebook environment that requires no setup. What’s more, it provides its users free access to high compute resources such as GPUs and TPUs that are essential to training models quickly and more efficiently!
In this article, we will learn how to use Google Colab and discuss its additional features over the vanilla Jupyter Notebook.
Best-suited Machine Learning courses for you
Learn Machine Learning with these high-rated online courses
Table of Content
- Why is Google Colab the Ultimate Tool
- Google Colab Quick Start Guide
- Google Colab Pro – Paid Version
Why is Google Colab the Ultimate Tool
Because your system’s configurations don’t matter AT ALL! With Colab, you can train your complex machine learning and deep learning models without worrying about the computational resources they require. GPUs and even much more expensive TPUs are provided by the platform free of cost!
I know I sound like a sponsored ad for Colab, but it truly is an offering like no other.
Let’s see why:
A plethora of Pre-installed Libraries
The Anaconda Jupyter Notebook comes with several pre-installed Python libraries such as Pandas, NumPy, Matplotlib, etc. Google Colab offers these libraries and on top of these, provides even more pre-installed ML libraries such as Keras, PyTorch, and TensorFlow.
Collaboration Capabilities
Similar to working on a Google Sheet, multiple developers can co-code on the same workbook simultaneously. This is particularly helpful if it is a group project, right? You can also share your work with your fellow developers.
Cloud Storage Solution
When you use Jupyter Notebook as your working environment, all your work is stored on the local machine. Opting for Colab, on the other hand, lets you access your workbooks seamlessly from any other device, as they are all saved in your Google Drive.
GPU and TPU Access
Training complex models might take hours on Jupyter Notebook because CPUs are slow to execute. Colab lets you use its dedicated GPUs and TPUs for your personal ML project implementation which takes hardly a few minutes.
Colab allows you to run your code for 24 hours without interruptions, and 12 hours if you connect to an interactive GPU-based VM runtime. For most folks, this is sufficient enough time to meet their computation needs. You can run multiple CPU, GPU, and TPU instances simultaneously, but the resources would be shared between these instances.
GPUs and TPUs cost a lot in the market and Google Colab offers them to you for free. Isn’t that amazing!
Must Check: What is Machine Learning?
Must Check: Machine Learning Online Courses & Certifications


Google Colab Quick Start Guide
Open Google Colab Notebook:
1. To get started with Google Colab, you can go to Google Drive and create a Google Drive account if you do not already have one.
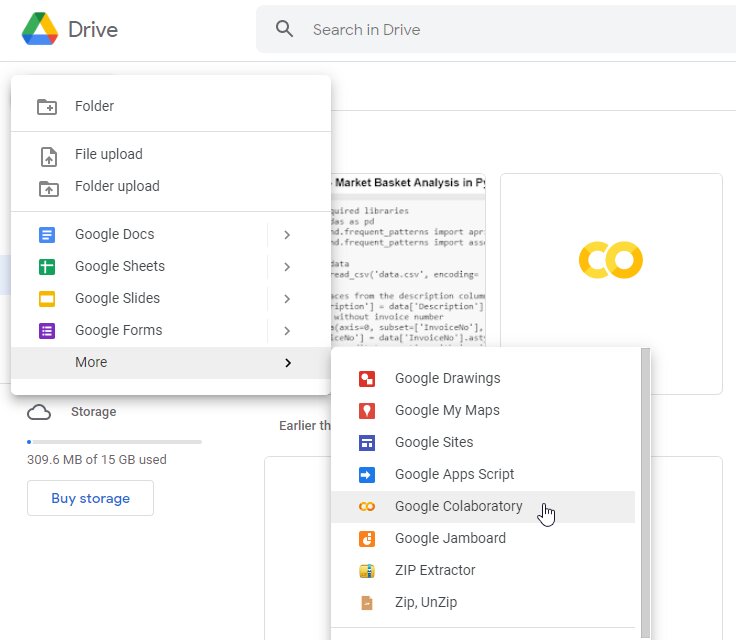
2. Click on the “New” button at the top left corner of your Google Drive page, then go to “More > Google Colaboratory”, as shown below:
This will open a new Google Colab notebook for you.
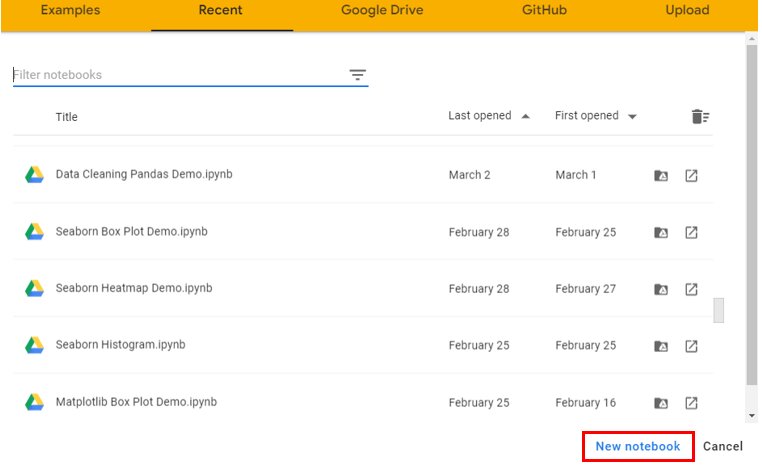
Or, you can directly go to Google Colab. You will see the following screen:
Click on the “NEW NOTEBOOK” button, as shown above, to create a new Colab notebook.
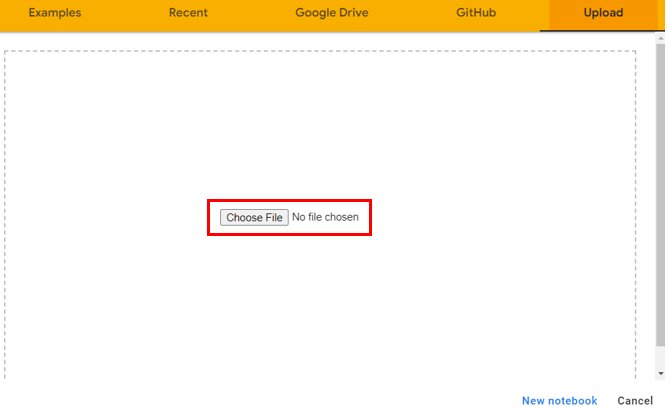
You can also upload your local file to Colab by clicking the “Upload” button:
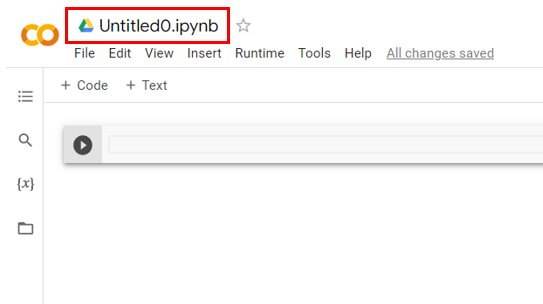
3. Now you have your notebook open. You can rename it by clicking on the notebook name and changing it to your respective project file name:
Choose Google Colab Runtime:
1. Click on the “Runtime” button on the top menu and select “Change Runtime Type”, as shown below:
2. Now you can change the runtime to GPU or TPU, as shown:


Explore your Google Colab Environment:
Let’s look at a few hotkeys that are similar on Colab as well as Jupyter Notebook:
- Run cell: Ctrl + Enter
- Run cell and add new cell below: Alt + Enter
- Run cell and go to the cell below: Shift + Enter
- Run selected part of a cell: Ctrl + Shift + Enter
- Indent line by two spaces: Ctrl + ]
- Unindent line by two spaces: Ctrl + [
1. Before you start coding, you can click on the “Share” button on the top right corner of the page to share your workbook with others:
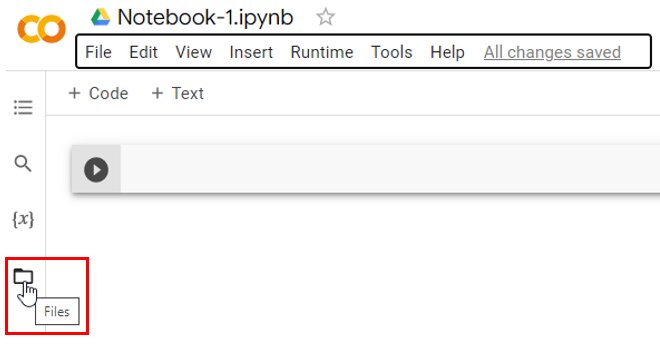
2. To explore your Colab file, click on the “File” icon on the left-hand side of the page, as shown:
3. Then, you can click on the “Upload to session storage” icon to upload the data file that will be used on your ML project:
4. Another recommended approach is to upload large data files to Google Drive and mount your drive on Colab. You can do this by clicking on the “Mount Drive” icon, as shown:
Save your Google Colab Notebook:
All Colab notebooks are stored on your Google Drive. Another one of the many useful things about Colab is that it saves your notebook automatically after a certain period, so you don’t lose your progress.
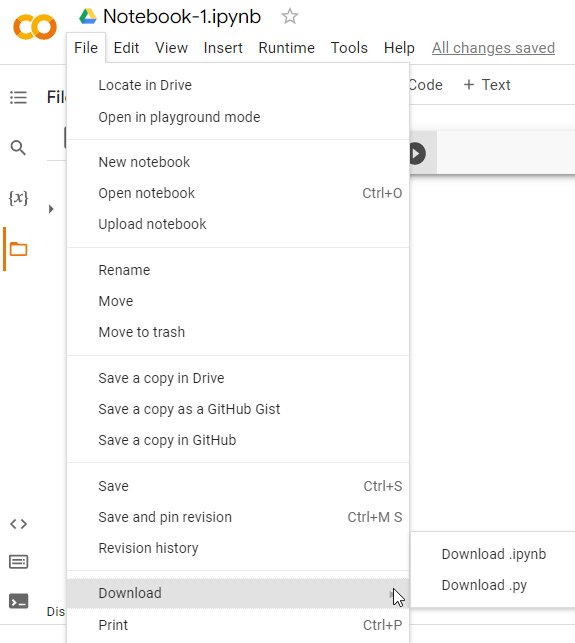
1. To save your Colab file, click on the “File” icon on the left-hand side of the page again and go to the “Download” option:
As shown, you can export and save your notebook in both *.py and *.ipynb formats.
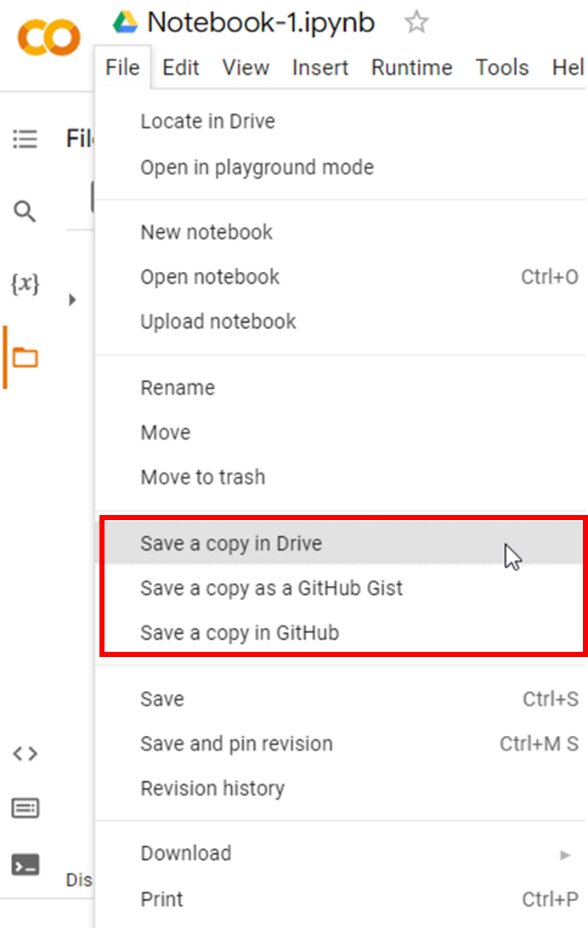
2. You can also save a copy of your notebook directly on GitHub, or you can create a GitHub Gist, as shown:

Google Colab Pro – Paid Version
Google Colab also provides you with a paid platform called Google Colab Pro. The subscription costs $9.99 per month. It gives you priority access to their fastest GPUs. For example, you can get a T4 or P100 GPU, along with the option of selecting an instance with a higher RAM. What’s more, your max computation time is doubled from 12 hours to 24 hours. Isn’t that cool?
Google Colab Pro is cheaper as compared to other cloud GPU providers such as AWS, Azure, and even GCP.
Conclusion
Google Colab is truly an awesome tool for machine learning projects and for developers working with Python who wish to use a cloud-based IDE. In this article, we have learned how to leverage Google Colab to get free access to higher memory and higher computational power. You learned how to use Google Colab with your Google Drive account, upload datasets to your workbook, and save your ML projects in the notebook.
Top Trending Articles:
Data Analyst Interview Questions | Data Science Interview Questions | Machine Learning Applications | Big Data vs Machine Learning | Data Scientist vs Data Analyst | How to Become a Data Analyst | Data Science vs. Big Data vs. Data Analytics | What is Data Science | What is a Data Scientist | What is Data Analyst
FAQs
What is Google collab?
Colaboratory, or Colab for short, is a product of Google Research. Colab allows anyone to write and run arbitrary Python code from the browser, making it especially suitable for machine learning, data analysis, and education. Technically, Colab is a hosted Jupyter notebook service that provides free access to computing resources, including GPUs, while requiring no setup to use.
How long can I use Google Colab for free?
GPU allocation per user is capped at a maximum of 12 hours at a time. The next time it's available is probably after 12 hours or when the user gives up on his GPU capabilities. Check out Google Colab Pro which has some advantages over the free version.
Where are notebooks stored and can they be shared?
Colab notebooks are stored in Google Drive or can be loaded from GitHub. Colab notebooks can be shared just like Google Docs and Sheets. Click the share button in the top right corner of your Colab notebook or follow the steps below to share your file to Google Drive.
This is a collection of insightful articles from domain experts in the fields of Cloud Computing, DevOps, AWS, Data Science, Machine Learning, AI, and Natural Language Processing. The range of topics caters to upski... Read Full Bio


